Secure VNC for the Raspberry Pi
VNC is not secure: the common method of using VNC with the Raspberry Pi is insecure. While it is functional—a remote VNC session can be established—it is at risk, especially when standard VNC is used over the Internet. But it only takes a few simple steps to make it secure. Security is very important: while there may or may not be anything valuable on your Raspberry Pi, it can be used by attackers as a foothold to attack more valuable targets.
The Raspberry Pi comes with a RealVNC VNC server, which implements both standard VNC as well as RealVNC own proprietary protocol.
Standard VNC is not secure. The communications is not encrypted and it only supports a very weak password that is 8 characters or less. But it can be used with any VNC client program.
RealVNC’s proprietary protocol should be secure. It supports encryption and longer passwords. But it can only be used with RealVNC’s own client program—standard VNC clients do not support the proprietary protocol.
This article describes how to use the standard VNC securely, by only using VNC over a secure SSH tunnel.
Setup
Enable remote access via SSH and VNC.
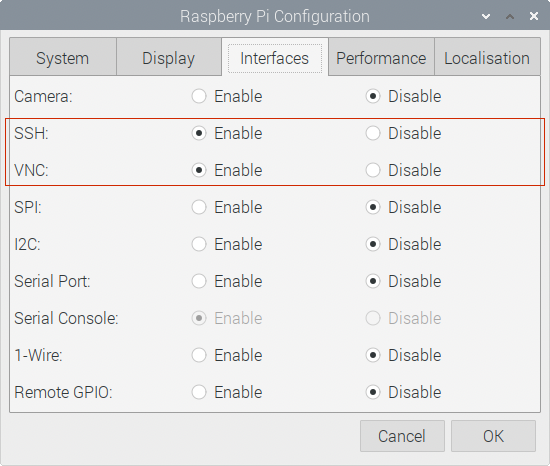
If using the graphical user interface, use the Raspberry Pi Configuration program:
- From the Raspberry Pi menu, choose Preferences > Raspberry Pi Configuration.
- Select the “Interfaces” tab.
- Enable both “SSH” and “VNC”.
- Press the “OK” button.
- Reboot.
If using the command line, run sudo raspi-config to do the same thing.
Configure the VNC server to only allow connections from localhost
When the VNC server is available, the VNC server icon should appear at the top right of the Raspberry Pi screen.
Open the VNC server settings. Either by:
- Clicking on the VNC server icon in the taskbar. Then click on the menu icon (top right corner of the “VNC Server” window) and select “Options”; or
- Right-click on the VNC server icon in the taskbar, and select “Options”.
In the “Security” section, change the authentication to “VNC password”. Do not use Unix password or Interactive unix authentication, which are proprietary to RealVNC. The encryption settings are also proprietary to RealVNC: it is safest to leave it set to “Prefer on”—do not change it to “Always on”, because that will prevent standard VNC clients from being used.
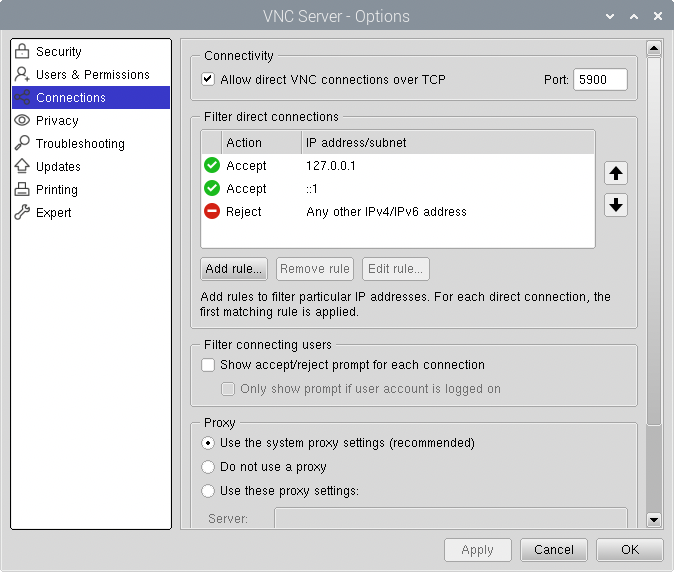
Select the “Connections” section and configure it to not allow remote clients to connect directly to the VNC server. Since direct connections with the unencrypted standard VNC protocol is insecure.
Press the “Add rule” button and create a rule for connections from “127.0.0.1” to “Accept the connection”.
Select the default “Any other IPv4/IPv6 address” rule and press the “Edit rule” button. Change the default rule to always “Reject the connection”.
Optionally, press the “Add rule” button again and create a rule for connections from “::1” to “Accept the connection”. This is needed if IPv6 is being used, but is not needed if only IPv4 is being used.
Press the “Apply” or “OK” button to make the changes.
If prompted, create a VNC password to use. Standard VNC only uses the first 8 characters of the password. A longer password can be set, but only the first 8 characters are examined when using standard VNC clients. Passwords longer than 8 characters only improve the security when using RealVNC’s proprietary client program and RealVNC’s proprietary protocol.
Note: in the “Connections” section, do not deselect the checkbox that says “Allow direct VNC connections over TCP”. Deselecting it will cause the RealVNC server to stop listening for VNC connections, and standard VNC clients will not be able to connect to the Raspberry Pi. If deselected, the Raspberry Pi will need to be configured with a RealVNC account and use RealVNC’s cloud-based service. Instead of clients connecting to the Raspberry Pi, the Raspberry Pi makes outgoing connections to RealVNC’s servers.
Don’t worry about using a strong password for the VNC password, since it is going to be weak no matter what value is used.
Connect to the VNC server over a SSH tunnel
To securely connect to the VNC server:
- Establish a SSH tunnel to the Raspberry Pi.
- Connect a VNC client program over that tunnel.
While the VNC protocol is insecure, it will be protected by the encrypted SSH tunnel.
The SSH tunnel can always be manually established. But some VNC client programs have built-in support for establishing the SSH tunnel. Here are two examples.
Connecting using the macOS Screen Sharing client.
The macOS operating system comes with a VNC client.
Create the SSH tunnel from the macOS command line:
$ ssh -L 9999:localhost:5900 pi@raspberrypi.local
Use the hostname with “.local” appended as the network address. The default hostname is “raspberrypi”.
The -L option establishes a SSH tunnel. Its argument is
bind-port:host:host-port, where the bind-port is the listening
port of the tunnel on the client machine (choose any unused port
number). Any connection established to it will go over the tunnel and
the other end will be connected from the other end of the tunnel to
host-port on the host. The host:host-port will always be
“localhost:5900”, since it should be connecting to the VNC server
(port 5900) on the host where the tunnel emerges (i.e. the Raspberry
Pi).
The macOS VNC client is an application called “Screen Sharing”. It can be found in System > Library > CoreServices > Applications > Screen Sharing, but is easily launched from the Finder.
In Finder, from the “Go” menu select “Connect to Server”
Type in “vnc://localhost:9999” as the server address. The network address part is always “localhost”, since it is referring to the listening end of the tunnel. The port number part is the bind-port number used for the listening end of the tunnel.
Press the “Connect” button.
When prompted, enter the VNC password and press the “Sign In” button.
Connecting using Screens
The Screens application is a commercial VNC client that has built-in support for SSH tunnels.
Run the “Screens” application.
Create a new connection, using File > New Screen or the “+” button.
- On the “Computer Info” tab, enter a meaningful name for the connection.
- For the “Address or Hostname” always enter “localhost”.
- Set the remote operating system to “Linux”
- For the Authentication type select “VNC Password”.
- Select the “Secure Connection” tab.
- Check the “Enable Secure Connections” checkbox.
- For the username, enter the user account on the Raspberry Pi (e.g. “pi”).
- If you have configured the user to use a SSH public key, press the key icon to the right of the password field and select the file containing the corresponding private key.
- For the host, enter the hostname or IP address of the Raspberry Pi (e.g. “raspberrypi.local”)
- Leave the port number as 22, and leave the “Enable Secure Connections on Local Network” checked.
- Press the “Test connection” button and the test should be successful.
- Press the “Save” button.
Use the connection.
- Double click on the connection in the Screens window.
- If you have configured it to use a SSH public-key, enter the passphrase to unlock the private key when prompted.
- Enter the Raspberry Pi user account’s password when prompted.
- Enter the VNC password when prompted for the “password to initiate the VNC session”.
Setup via the command line
The above setup can also be performed entirely via the command line.
Start and enable the SSH server:
sudo systemctl start ssh
sudo systemctl enable ssh
Edit the /etc/vnc/config.d/common.custom file to contain a statement to set the authentication type to “VncAuth”, and use the vncpasswd to add a password statement to it:
echo Authentication=VncAuth | sudo tee /etc/vnc/config.d/common.custom
sudo vncpasswd -file /etc/vnc/config.d/common.custom
Restrict VNC access to localhost, by editing /root/.vnc/config.d/vncserver-x11 and change the value of the “IpClientAddress”. Its value is a sequence of IP address rules, separated by commas; a leading plus means allow and a minus (i.e. hyphen) meaning disallow. Set it to
+127.0.0.1,+::1,-so it will allows access from 127.0.0.1 and ::1, but deny connections from anywhere else.IpClientAddresses=+127.0.0.1,+::1,-Edit it using a text editor or use the following command:
sudo sed -i s/^IpClientAddresses=.*/IpClientAddresses=+127.0.0.1,+::1,-/ \
    /root/.vnc/config.d/vncserver-x11
Restart and enable the RealVNC server:
sudo systemctl restart vncserver-x11-serviced.service
sudo systemctl enable vncserver-x11-serviced.service
In the above, enabling a service means the service will start when the computer boots. Starting a service means run the service right now (which is something the Raspberry Pi configuration program does not do, which is why a reboot is required after using it). Restarting a service will ensure it is running with the new settings: if it is not already running, it is started; if it is already running, it is stopped and then started.
Other tasks
Changing the screen resolution
If you need to change the resolution of the screen, it is easily done
with the Raspberry Pi Configuration application or the text-based
raspi-config program.
It can be done by editing the hdmi_group and hdmi_mode entries in
/boot/config.txt, but that requires knowing the numeric value to set
it to. See the config.txt documentation for the values to use.
Changing the VNC password
To change the VNC password:
- Open the VNC server settings.
- Select the “Users & Permissions” section.
- Select “Standard user (user)”.
- Press the “Password” button.
Or use vncpasswd to change the /etc/vnc/config.d/common.custom
config file.